Search This Blog

Showing posts with label Kitchen. Show all posts

Saturday, March 12, 2011

Small Kitchen Improvements

Its been a bit quiet over here and thats mainly due to lack of funds.  We have still be busy with finishing up some more minor details that actually make a huge impact in the kitchen.

BEFORE


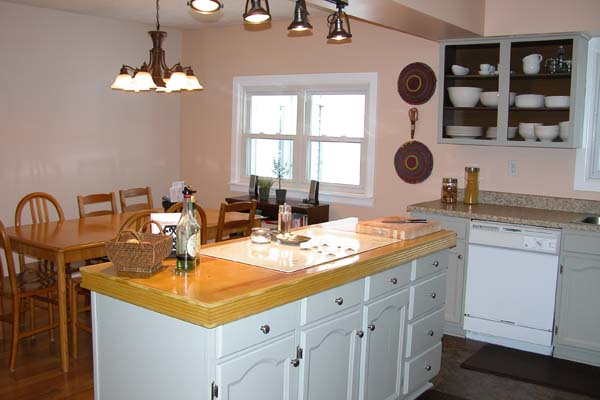
First, I spent a Sunday filling in most of the gaps in the kitchen cabinets with spackle, sanded it, and touched it up with paint.  When the cabinets were black, it hid some of the spacing issues that come with an old kitchen and painting everything a lighter grey shade made these little imperfections fairly obvious (at least to J and I).  Filling in the holes was one of those projects that probably never would have been completed if we had money to move on to the next room.  The space looks much more "finished" with that detail taken care of and we couldnt be happier with the results (unless we had a whole new kitchen). 

Second, I finally took the time to paint the inside of our open cabinet.  By painting the back of the cabinet the same color as the wall and the inside walls of the cabinet the same grey, it really brightens up the space.  No longer is there a black hole on the wall where seemingly no light can enter.  The new paint job also shows off our everyday plates, serveware, and glass storage containers very well. 

Third, and lastly, we had a new faucet installed.  The prior faucet was old and busted - literally.  The sprayer nozzle leaked and had to be pulled out and laid in the sink to keep the water from rushing into the cabinet space below.  Every time we turned the water on the entire system would make a terrible "whoomp, whoomp, whoomp" sound from the air escaping into the pipes.  The faster the water, the more quickly it would "whoomp."  It wasnt good.  In addition,the shallow depth of the sink was accentuated by the low arc of the faucet itself.  The configuration actually prevented us from filling pots with water for pasta.  We had to use a fancy tilt method that was precarious and extremely inconvenient in order to fill the taller of our pots.  We ended up choosing a faucet with a high arc and a sprayer nozzle built in to the head of the faucet.  This left a spare hole in the sink that we will eventually fill with a soap dispenser so we dont have to keep the palm olive out on the sink's ledge.


These seemingly small changes made a huge difference in our happiness with the space.  No longer do we focus on the blemishes in our cabinets and we can utilize the space in a much more comfortable way.  Of course, there is still an extensive wishlist for the kitchen, but our current set up isnt half bad.

AFTER

Monday, February 21, 2011

Anything but Painting

On Wednesday of last week I asked J which room he wanted to paint this weekend.  We both agreed that the Master Bedroom needed our attention.  After all, I had finally finished the curtains in that room and they were garish in comparison to the poop brown wall color.  On Friday, however, when I got home from work, we discovered that we had done a bit too much shopping for the house last week with the new kitchen faucet, the new curtain rods, and the (fabulous) sewing cabinet.  In short, we were out of money for paint. 

We did think ahead, however, and had purchased the 5 gallon bucket of primer, knowing full well that every wall in our new home was in need of repainting.  We figured that instead of painting, we would get the rest of the rooms ready for whenever the money did reappear in our checking account.

It turns out, we had run out of steam as well.  By Saturday afternoon, after spending a nice morning having breakfast with friends and strolling the antique stores in town, it became very clear that no one was going to be priming anything.  Instead, J created lesson plans for his classes this week and I converted two 84 inch sheers into three curtains.

When we first moved into the home we had expected to have the window treatments left behind as it said on the spec sheet for the house.  After moving in we realized that the Master Bedroom, with a window that looks directly out to the street, was left window treatment free.  Having been Christmas time, I put up some very festive, very green tissue paper to block our bodies from the street but after about a week of living with a green hue J implored me to find another solution.

After a trip to Target I had purchased and installed pressure rods with 84 inch sheers over the windows.  It didnt keep us from flashing our neighbors at night if we happened to leave the light on, but it kept random pedestrians from glancing into our private bedroom during the day.  At $7.99 a piece, the sheers were a economical solution to our immediate problem of privacy.

Notice the spacing of the grommets has been corrected as well!
This weekend I took one of the sheers, turned it horizontal, and sewed a pocket for a curtain rod.  It happened to be just the right length to cover the glass portion of the window in the Master Bedroom and allowed the navy curtains to hang at the appropriate length since the sheers were no longer gathering on the floor.  The result is a sheer curtain with sleek horizontal lines that forms a flat panel behind our grommetted navy faux-silk curtains.  The sheer cannot be pulled to either side, but given that our window faces the street I figured we would never want to pull them aside for any reason anyways.


I turned the other sheer curtain into two cafe curtains for the kitchen.  It just so happened that the top and bottom hem of the sheer were the same width so I folded the curtain in half, cut them to the right length, hemmed them, and stuck them up in the windows.  The pressure rods I had purchased for the bedroom were reused in the kitchen since the window was the same width.

That's our Vomer kitty in the window watching the rain.

The new sheers for the kitchen also solve a privacy issue since we took down and tossed the blinds that were in the window last month given that they were totally disgusting and dirty from the prior owners.  The sheers let light in and block the view of our kitchen from the alley which is important since we sometime run for a glass of water in the evenings around bedtime in the nude. 

On Sunday when J was at work, I took the time to sew the curtain for the guest bedroom.  I purchased the fabric from Joann.com at 40% off and found a free shipping coupon online as well.  The fabric was originally $40 and I got it for something like $24 a yard and saved $12 on shipping.  It was a deal.  I hadnt actually seen the fabric in person which was a bit of a gamble, but I found a blog where the person had used the fabric in the office for curtains and they looked lovely, so I took the chance on it too.


The fabric was the most luxurious I have worked with yet.  It was soft and smooth and rich and I wished I had bought 6 more yards of it to make a blanket with.  Its a cotton and linen blend and the design is a damask that mimics ikat style.  The background is slightly off-white and the greys and yellows are variegated.  I purchased just three yards  so that I could do a single panel curtain and pull it back to one side to let in the light.  The window in the guest bedroom is small and the room is narrow so I didnt want to make the room feel cluttered or more narrow with a curtain on both sides.  In addition, I didnt want to pay double for the project.


 As always, my kitties were a big help in making sure the fabric didnt float away.  Once the room is painted I will post photos since you can see the fabric design here and the wall color is so hideous still that it doesnt do the curtain any favors.  With grey walls and yellow accents, the guestroom is inspired by some homes I saw when visiting New Orleans with my mother last October.  The color combination was so regal, elegant, and timeless that  I wanted to reproduce it in my own home.  I think this curtain fabric is the prettiest thing I have seen in quite a while!

Wednesday, February 9, 2011

Another Reveal

I have been talking a lot about our new kitchen and how wonderful the transformation turned out.  I have been beaming about how bright and airy it appears and how much happier it makes me.  I have been talking about the new buffet and the great plans I have for a dining room table. Well, here it is...the "new" kitchen.

It went from this:


To this:


And all in just a few weeks time.

Here are a few more pictures that will hit it on home. 

We are planning to paint the inside of the open cabinet for a more polished look

There will soon be curtains on the window, but doesnt the white frame look gorgeous!

This is a view from the living room into the kitchen.  We selected colors that transition well between rooms.
We are just SO thrilled with the results.  The cabinets are still old and busted but they are much more tolerable and the new color scheme makes even being in the room more pleasant.  I am less grumpy when cooking and everything cleans up so much easier now that it has a semi-gloss finish.

I think my Dad is planning on coming to visit at the end of April and one of the projects he may choose to help us with is changing out the light fixtures for something that matches the new decor.  Not only do I not really know what type of light fixture I want in the new space, but I have no idea how to change a fixture anyways so I am waiting for the expert.

While the clutter and disarray in the kitchen left me wanting to tear my hair out, the kitties loved the little nooks and crannies and drawers.  They loved discovering new areas to hide and all the new places they could squeeze their tiny bodies in to.

Vomer particularly loved to wait in the space left vacant by the drawer below the cutting board.  I think she was hoping I would drop a fresh piece of shrimp by accident the entire time.


Boo, on the other hand, liked to curl up in the drawer with the spare kitchen towels.  This of course meant that they all had to be rewashed before reassembling the kitchen. 


The things we put up with for the love of our pets!

Tuesday, February 8, 2011

Dining Room Tables

The buffet arrived yesterday and is great.  Its worth at least $100 even though I only paid $50 for it.  It needs a thick layer of paint but is a perfect length and depth for the dining room.  The kitties loved exploring it yesterday too - must have had some interesting smells.  Its not quite as red as I thought it would be but is a brick tone thats a bit more subtle.  It will work until the weather gets good enough to take it outside for a thorough sanding.

With that piece of furniture introduced to the dining area, I was inspired to find some dining tables that might work in the space.  I would ideally like to seat 10 people with the leaves in and want to try a bit more of an eclectic look by incorporating chairs of different styles.  I was hoping to find some with an upholstered seat so I could unify them through a textile but we'll see how that goes.  Gotta get a table first. 


The tables I found are on the pricey side - for us - but I think its possible to find something similar on craigslist or at the auctions that I have just discovered in the area.  They will already be a little loved but they will also be a lot cheaper.


I tend to like the classic style and think the one with colored legs might work best with the eclectic look I am hoping to achieve.  I particularly like the little floral pattern on the legs that is reminiscent of the Victorian era.

Monday, February 7, 2011

Watching the Paint Dry

Well, we arent so much watching the paint dry as waiting for the paint to dry, but you get the picture.  J put the cabinet doors back on last week and the kitchen has been completely transformed - completely.  I put the final coat of paint on the drawers this weekend and we are giving them a few days to cure before sitting them back in their respective locations.

I would have taken some pictures of the almost completed project, but the contents of the drawers are sitting out all over the kitchen.  Needlesstosay, I want my kitchen and dining room space back.  I dont want to find my kitties lounging on my silverware any longer and I am looking forward to eating at the dining room table every now and then instead of in front of the TV. 

After the drawers are back in place, there are a few others things that need to be taken care of in the area before it can truly be considered complete.  First, I need to get the curtains up on the windows.  Once I get the master bedroom curtains done, I will be repurposing a long sheer from Target into two custom kitchen curtains.  Second, we are looking for a buffet for the dining room area as well as a new kitchen table.  The one we have from Jonathan's parents has varnish that melts every time it gets the slightest bit warm out and it has a leaf that isnt the same color as the rest of the table.  Ideally the buffet wont stick out from the wall too far, contains storage, and will serve as a depository for our bills and netflix dvds.  We would like our dining room table to seat 6 and have the potential to seat 8 or 10 with additional leaves.  I have yet to find one in a style I like so the search is still on. 


This is the photo of a buffet we may be picking up courtesy of craigslist.  It is solid wood, all the drawers work, and its 6 feet long but only 18 inches deep so it would work great in the space.  Its also only $50 which makes up for the fact that its painted barn red - paint is something we can work with!

Friday, January 28, 2011

Let There Be Dust!

I sanded everything but the cabinet fronts last night!  It made such a dusty mess that I am determined to take the cabinet doors outside to sand even though temperatures are supposed to below freezing this weekend.  At least taking them outside will minimize the damage to our nose and lungs and our kitties that have to live in the disaster zone.

Hoping to urge the process along, I sanded them after I got home last night thinking that we would HAVE to paint this weekend - being past the point of no return - and, knowing me, the project would be completed by Sunday. 

The prior owners did some half-ass work evidently because when I sanded some areas the paint just started to peel off.  In other areas you can see the wood finish through the paint even though I just did a very light sanding job to rough up the surface. 

Regardless of their errors and misjudgements, our cabinets will be glistening and beautiful by weekend's end!

Thursday, January 20, 2011

The Kitchen Project

The hubby and I are beginning the kitchen project this weekend.  We are doing a budget revamp of the space by painting the baby-poop brown walls and bringing some sophistication to the area with a new shade on the cabinets as well. 


Our dining room and kitchen are open to eachother and the living room is open to the dining room so our colors have to be somewhat cohesive.  We are using the same Behr Clamshell color on two of the walls and Behr Cinnamon Cake on the other two walls.  Our trim will be Ultra Pure White like the rest of the house and the cabinets are going to be a chic grey with Behr's Granite Boulder shade. 

The room will look instantly upated since the country style dark varnished window frames will be coated with the semi-gloss white.  Also, we are planning on taking off the cabinet doors to the section of storage that houses our white plates and dishes.  Since they are white and always neatly stacked, I thought it might add some charm and create more of an open feel - plus it will just be a nice change. 

All that means that tomorrow we will be sanding, de-hinging, and priming the area.  Saturday and Sunday will be spent hand painting the cabinets which may be a job reserved for me if J cant keep from making the paint drip.


Anyways, enjoy the before pictures since this will look vastly differnt in just 72 hours!